
You don’t need a Spark cluster, a managed catalog service, or a cloud bill to try out real lakehouse features. With DuckDB and its DuckLake extension, you can build a working lakehouse, complete with ACID transactions, time travel, and schema evolution, entirely on your laptop, using nothing but a folder and a SQL connection.
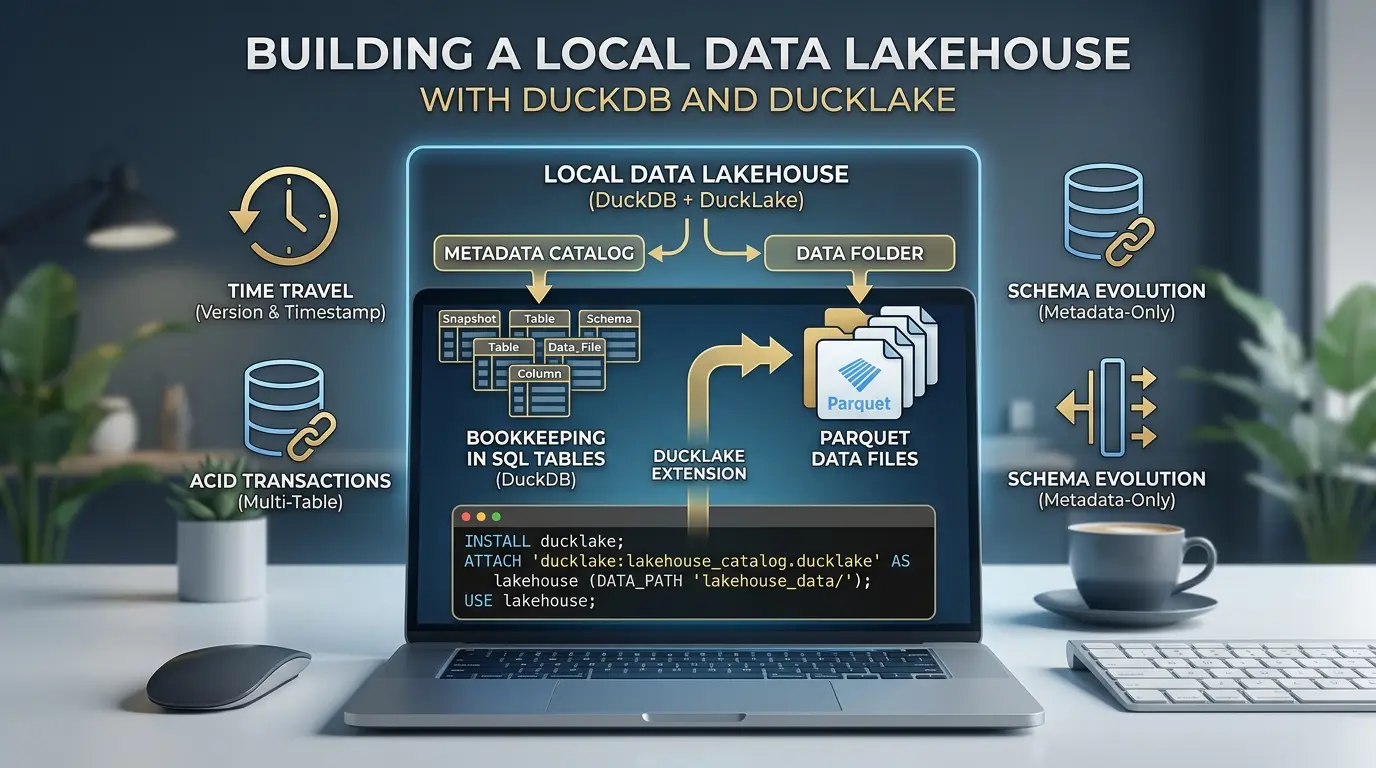
Local Data Lakehouse
This guide walks through doing exactly that, step by step. By the end, you’ll have a local lakehouse with two tables, several versions of history behind them, and a clear sense of what’s actually happening under the hood every time you run a query.
- A local DuckLake instance with a SQL catalog and a Parquet data folder
- Two related tables, populated and queried
- A look at exactly how your data is stored on disk
- A time-travel query against an old snapshot
- A schema change that touches zero existing data
- An atomic transaction across two tables, including a rollback
- A pattern for handling lots of small writes without littering Parquet files
- A routine maintenance pass, compaction, snapshot expiry, and cleanup
- A path from a single-laptop catalog to a multi-writer PostgreSQL catalog
- A direct SQL query against the metadata catalog itself
- A migration path for copying tables to and from Apache Iceberg
Still deciding whether DuckLake is the right fit before you commit time to building one? Our DuckLake vs. Apache Iceberg comparison covers the architecture trade-offs, cost differences, and when each format actually wins, worth a read first if you haven’t picked a format yet.
Prerequisites

Before starting, make sure you have:
- Python 3.9 or later, or the standalone DuckDB CLI, either works for every step in this guide
- DuckDB 1.5.2 or later, this is the version that ships DuckLake 1.0 as a stable extension. Check your version with duckdb –version or import duckdb; print(duckdb.__version__)
- About 50MB of free disk space for the sample data and catalog files
- Docker (optional), only needed if you want to follow Step 10, which uses a local PostgreSQL container. Everything before that step runs with zero extra dependencies
This guide is written and tested against DuckLake 1.0 (released April 2026). If you’re on an older DuckDB version, run INSTALL ducklake first to pull the latest extension build, DuckDB will fetch a compatible version automatically.
DATA_PATH at S3/GCS at the very end. Everything else runs fully offline. Why the Metadata Layer Is the Interesting Part
In most lakehouse formats, your actual data is a handful of clean Parquet files. The complicated part is the bookkeeping: which files belong to which table, what changed in which version, what the current schema is. In Iceberg and Delta Lake, that bookkeeping lives in its own sprawling tree of JSON and Avro manifest files sitting next to your data.

DuckLake takes a different approach: it stores that bookkeeping in actual SQL tables. The reasoning is straightforward, relational databases have been the best tool in computing for tracking exactly this kind of structured, frequently-updated metadata for decades, so DuckLake just uses one instead of inventing a new file format.
Quick definition: In DuckLake, a catalog is the database (DuckDB, SQLite, or PostgreSQL) holding every table’s schema, snapshot history, and list of active Parquet files. The data path is just a folder where the actual Parquet files live. Two systems, one job each.
That’s the whole architecture. Once it clicks, every feature below, time travel, schema changes, transactions, turns out to be a natural consequence of that one design choice rather than a separate thing DuckLake had to build.
Step 1: Install DuckDB and the DuckLake Extension

You only need the DuckDB CLI or Python client. The ducklake extension installs the first time you use it.
pip install duckdbIf you’re using the CLI directly instead of Python, download it from duckdb.org and the same INSTALL/LOAD commands below will apply inside the duckdb shell.
Step 2: Attach Your First Lakehouse

This is the single statement that creates the whole architecture: a catalog file to hold metadata, and a folder to hold data.
INSTALL ducklake;

ATTACH 'ducklake:lakehouse_catalog.ducklake' AS lakehouse
(DATA_PATH 'lakehouse_data/');

USE lakehouse;
Read that ATTACH line carefully, it’s the entire design in one statement. The ducklake: prefix followed by a path tells DuckDB to keep all metadata in that one file. DATA_PATH tells it where Parquet files will physically land. USE lakehouse means you don’t have to prefix every table name afterward.
lakehouse_catalog.ducklake (a DuckDB file) sitting next to an empty lakehouse_data/ folder. Nothing in the data folder yet — that only fills in once you insert rows. ATTACH statement only lasts for your current DuckDB connection. If you close your terminal, restart your Python kernel, or open a new notebook session, you’ll need to run ATTACH again before any of the following steps will work — your data isn’t lost, you’re just reconnecting to the same catalog file and data folder you already created. Takeaway: One ATTACH statement separates your metadata (a SQL file) from your data (a folder of Parquet), that split is the entire DuckLake architecture.
Step 3: Create and Load Tables

With a typical “customers and orders” shape, the kind of relationship almost every real dataset has, create two tables and load some rows.
CREATE TABLE customers (
    customer_id INTEGER,
    name VARCHAR,
    signup_date DATE
);

CREATE TABLE orders (
    order_id INTEGER,
    customer_id INTEGER,
    amount DECIMAL(10,2),
    order_date DATE
);

INSERT INTO customers VALUES
    (1, 'Alice', '2026-01-10'),
    (2, 'Bob', '2026-02-03'),
    (3, 'Charlie', '2026-02-20');

INSERT INTO orders VALUES
    (101, 1, 49.99, '2026-03-01'),
    (102, 2, 120.00, '2026-03-02'),
    (103, 1, 15.50, '2026-03-05');
Nothing unusual here, it’s ordinary SQL. But behind the scenes, every one of these statements just recorded a new snapshot in the catalog. That snapshot history is what makes the rest of this tutorial possible.
Step 4: Inspect Where Your Data Actually Lives

A natural question with any lakehouse is: where is my stuff, physically? DuckLake answers this directly, because the answer is just a query.
-- How many Parquet files per table, and how big
SELECT *
FROM ducklake_table_info('lakehouse');

-- Every version of the lakehouse so far
SELECT *
FROM ducklake_snapshots('lakehouse');
ducklake_table_info reports, per table, how many Parquet files back it and how many bytes each one takes, right now, that’s one small file per table. ducklake_snapshots lists every committed version: snapshot 0 is the catalog initializing, then one snapshot per CREATE TABLE, then one per INSERT. Every change you made is a row in a table, not a file you’d have to go parse.
You can confirm the physical side too, list the actual Parquet files DuckLake wrote:
import os

for root, dirs, files in os.walk("lakehouse_data"):
    for f in files:
        if f.endswith(".parquet"):
            path = os.path.join(root, f)

            print(
                f"{path} "
                f"({os.path.getsize(path)} bytes)"
            )
You should see a couple of small Parquet files holding your data, and one .ducklake file holding all the metadata. That’s the separation in practice, not just in theory.
Step 5: Time Travel in SQL – Query a Previous Data Version
This is the lakehouse feature people get most excited about, and DuckLake gets it almost for free because it already keeps a full snapshot log.

First, simulate the next day’s load:
INSERT INTO orders VALUES
    (104, 3, 75.00, '2026-03-06'),
    (105, 2, 32.40, '2026-03-06');

SELECT COUNT(*), SUM(amount)
FROM orders;

-- 5 rows, revenue up to 292.89
Now query the table as it existed before that batch landed, using the same table, same query, just a different version:
SELECT COUNT(*), SUM(amount)
FROM orders AT (VERSION => 4);

-- 3 rows, revenue 185.49 — exact same numbers as before today's batch
There’s no backup to restore, no separate audit table you had to maintain. The AT (VERSION => 4) clause tells DuckLake to resolve the file list as it stood at that snapshot and just run your query against those files. You can also travel by timestamp instead of version number if that’s more natural for your use case:
SELECT *
FROM orders AT (TIMESTAMP => now() - INTERVAL '1 hour');
Takeaway: Time travel in DuckLake isn’t a special backup mechanism, it’s the same query engine resolving a different, already-recorded file list.
Step 6: Schema Evolution Without Rewriting Data
Here’s the feature that best demonstrates why metadata-as-database matters: schema changes in DuckLake are metadata-only. No Parquet file ever gets rewritten just because you changed a column.

Add two columns to customers, one with a default value:
ALTER TABLE customers
ADD COLUMN loyalty_tier VARCHAR DEFAULT 'bronze';

ALTER TABLE customers
ADD COLUMN lifetime_value DECIMAL(10,2) DEFAULT 0;

SELECT * FROM customers;
Existing rows didn’t have these values when they were written, the default gets filled in at read time, straight from the catalog. The old Parquet files that predate these columns are never touched.
Now rename a column:
ALTER TABLE customers
RENAME COLUMN name TO full_name;

SELECT full_name, loyalty_tier
FROM customers;
Inside the physical Parquet file, the column is still called name, DuckLake just records in the catalog that the name the world now calls full_name maps to that underlying data. The rename is a metadata edit, nothing more.
Prove it to yourself by checking the file count before and after:
SELECT *
FROM ducklake_table_info('lakehouse')
WHERE table_name = 'customers';

-- file count and byte size match what you saw in Step 4
Same files, same bytes. You added a column, renamed a column, and DuckLake wrote zero bytes of new data, because there was no new data to write.
Step 7: Multi-Table Transactions

Real changes often span more than one table. Think about processing an order: you want to insert the order row andupdate the customer’s running total, and you want either both to happen or neither.
BEGIN TRANSACTION;

INSERT INTO orders VALUES
    (106, 3, 88.00, '2026-03-07');

UPDATE customers
SET loyalty_tier = 'gold',
    lifetime_value = lifetime_value + 88.00
WHERE customer_id = 3;

COMMIT;
Both changes land in a single snapshot, you can confirm it by checking the latest entry in ducklake_snapshots, where you’ll see both tables listed as changed in the same version. That’s one atomic unit across two tables, because the catalog is a real database and real databases already know how to do this.
The rollback side works exactly as you’d hope, too:
BEGIN TRANSACTION;

UPDATE customers
SET loyalty_tier = 'platinum';

DELETE FROM orders
WHERE amount > 50;

ROLLBACK;

-- Check nothing actually changed
SELECT loyalty_tier, COUNT(*)
FROM customers
GROUP BY loyalty_tier;

SELECT COUNT(*)
FROM orders;
ROLLBACK instead of COMMIT means none of it happened. Both tables are exactly as they were — no partial state, no orphaned files left behind in the data folder.
Takeaway: Cross-table atomicity isn’t something DuckLake had to build from scratch, it’s inherited directly from the transactional database backing the catalog.
Step 8: Handling Small Writes in DucKDB (Data Inlining)
Every insert so far has written a brand-new Parquet file. That’s fine for the batch sizes in this tutorial, but it doesn’t scale to a real streaming or CDC workload, inserting one or two rows at a time would otherwise litter your data folder with tiny files, which hurts query performance later.

DuckLake’s answer is data inlining: small inserts, updates, and deletes get staged directly inside the catalog database itself, instead of immediately becoming a new Parquet file. Try it:
-- Several tiny inserts, simulating a trickle of streaming events

INSERT INTO orders VALUES (107, 1, 12.00, '2026-03-08');
INSERT INTO orders VALUES (108, 2, 9.50, '2026-03-08');
INSERT INTO orders VALUES (109, 3, 44.20, '2026-03-08');

-- These rows are visible immediately in normal queries
SELECT *
FROM orders
WHERE order_id >= 107;
Those rows are queryable right away, even though they haven’t necessarily been written out as standalone Parquet files yet, they may still be sitting in the catalog database. When you’re ready to flush them out to proper Parquet storage (and this is something you’d schedule periodically in production, not run after every insert), call the flush function explicitly:
CALL ducklake_flush_inlined_data('lakehouse');This consolidates everything sitting in the catalog’s inline staging area into a proper, optimized Parquet file, and time travel still works correctly across the boundary, querying an old version still returns the inlined rows as they existed at that snapshot, because the flush doesn’t lose any history.
Takeaway: Inlining moves the small-file problem out of object storage and into the catalog database, where small frequent writes are exactly what relational databases are built to absorb efficiently.
Step 9: Routine Maintenance – Compaction, Snapshot Expiry, Cleanup
DuckLake never deletes anything automatically. Old Parquet files from superseded versions stick around, by design, since that’s what makes time travel possible, but that means a lakehouse you actually run for a while needs periodic maintenance, the same way any production database needs vacuuming.

There are four maintenance operations worth knowing, and you can run them individually or all at once:
-- Merge small adjacent Parquet files into fewer, larger ones
CALL ducklake_merge_adjacent_files('lakehouse');

-- Remove snapshots older than 7 days, keeping at least 5 recent versions
CALL ducklake_expire_snapshots(
    'lakehouse',
    older_than => now() - INTERVAL '7 days',
    versions => 5
);

-- Rewrite files that have accumulated too many row-level deletes
CALL ducklake_rewrite_data_files(
    'lakehouse',
    delete_threshold => 0.5
);

-- Physically remove orphaned files left behind by expired snapshots
CALL ducklake_cleanup_old_files(
    'lakehouse',
    older_than => now() - INTERVAL '30 days'
);
Or run all of them together with a single CHECKPOINT , it executes the inline flush, snapshot expiry, file rewrite, merge, and cleanup steps in the correct order:
CHECKPOINT lakehouse;One important detail: expiring a snapshot is the only thing that actually frees physical storage. Time travel works because old data files stay around indefinitely by default, dropping a table doesn’t delete its files, and deleting rows doesn’t delete the Parquet bytes behind them, until the snapshots referencing that old data are explicitly expired and the orphaned files are cleaned up.
CHECKPOINT (or the individual maintenance calls) periodically once this moves beyond a tutorial and into something you run continuously. Step 10: Scaling to Multiple Writers with PostgreSQL
Everything above used DuckDB itself as the catalog, which has one real constraint worth knowing before you build anything serious on it: a DuckDB-backed catalog only supports a single client at a time. That’s fine for this tutorial, but it won’t work if you want two scripts, two teammates, or a scheduled job and a notebook all writing concurrently.

The fix doesn’t change anything you’ve already learned, it changes one line. Point the catalog at PostgreSQL instead of a local file:
INSTALL ducklake;
INSTALL postgres;

-- Assumes a 'ducklake_catalog' database already exists in Postgres
ATTACH 'ducklake:postgres:dbname=ducklake_catalog host=localhost'
AS lakehouse (DATA_PATH 'lakehouse_data/');

USE lakehouse;
If you don’t have a local Postgres instance handy, Docker gets you one in a single command:
docker run --name ducklake-catalog \
  -e POSTGRES_DB=ducklake_catalog \
  -e POSTGRES_USER=ducklake \
  -e POSTGRES_PASSWORD=ducklake \
  -p 5432:5432 \
  -d postgres:16
Every SQL statement from Steps 3 through 9, creates, inserts, time travel, schema changes, transactions, maintenance, works identically against this catalog. The only thing that changed is where the bookkeeping lives. Multiple DuckDB processes can now connect to the same lakehouse and coordinate safely through Postgres’s own concurrency control, which is the same mechanism that makes the multi-table transactions in Step 7 atomic in the first place, just now shared across more than one client.
Takeaway: Moving from a single-laptop prototype to a real multi-writer lakehouse is a change to your ATTACH statement, not a rewrite of your data model or your queries.
Step 11: Query the Metadata Catalog Directly
The last piece is the one that shows DuckLake’s whole thesis in action: the metadata catalog is just a database, so you can query it with ordinary SQL, no DuckLake extension required for this part.

If you attached using a DuckDB-backed catalog, the metadata tables live in a separate internal catalog named after a pattern like __ducklake_metadata_lakehouse. You can list every table in it directly:
SELECT table_name
FROM duckdb_tables()
WHERE database_name LIKE '\_\_ducklake\_metadata%' ESCAPE '\';
That returns the real, underlying catalog tables, snapshot, table, schema, data_file, column, and more. Every one of these is something you’re free to inspect directly:
-- Full version history as plain rows
SELECT *
FROM ducklake_snapshots('lakehouse');

-- Every physical Parquet file behind every logical table
SELECT *
FROM ducklake_table_info('lakehouse');
Nothing here is magic. The column rename you did in Step 6 isn’t some opaque format-internal operation hidden in a binary log, it’s a row in a metadata table that you could, in principle, have written yourself with a plain UPDATE statement. That transparency is the practical reward for choosing a database over a custom file format: you already know how to look inside it.
Step 12: Copying Data To and From Apache Iceberg

If you’re not starting from scratch, say, you already have Iceberg tables and want to try DuckLake without committing to a full migration, DuckLake supports copying data between the two formats in either direction, powered by DuckDB’s iceberg extension.
INSTALL iceberg;
LOAD iceberg;

-- Attach an existing Iceberg REST catalog
ATTACH '' AS iceberg_source
(
  TYPE iceberg,
  ENDPOINT 'http://127.0.0.1:8181'
);

-- Copy the table's data and metadata into your DuckLake instance
CREATE TABLE lakehouse.imported_orders AS
SELECT *
FROM iceberg_source.default.orders;
This is a real, working migration path, not a live cross-engine read, it’s a COPY-style operation, so the data physically moves (or shallow-copies) between the two catalogs rather than DuckLake querying Iceberg’s manifest tree directly. Going the other direction works the same way: query your DuckLake table and write it out through the Iceberg extension. The deletion vectors DuckLake writes are specifically designed to be Iceberg-compatible, which is what makes this round trip possible at all.
Takeaway: You don’t have to choose DuckLake or Iceberg in a vacuum, DuckDB’s interoperability layer lets you trial DuckLake against real data you already have, one table at a time.
Common Mistakes to Avoid

Treating a DuckDB-backed catalog as multi-user
If you attach with a plain .ducklake file as the catalog, you’re limited to a single client, this is documented behavior, not a bug. The moment more than one process needs to write, switch to a Postgres-backed catalog as shown in Step 10, before you hit conflicts.
Assuming ducklake_expire_snapshots deletes files immediately
It doesn’t. Expiring a snapshot only marks its files as no longer referenced; they still sit on disk until you separately run ducklake_cleanup_old_files. If you expect storage to shrink right after expiring snapshots and it doesn’t, this is why.
Skipping dry_run before cleanup
Both the expire and cleanup functions support a dry-run preview. Since expiring a snapshot removes your ability to time-travel back to it, and cleanup permanently deletes files, running these blind in a script you haven’t tested is the easiest way to lose history you actually wanted.
Letting small batch inserts pile up unflushed or unmerged
If you’re streaming in small, frequent writes, either lean on data inlining (Step 8) or run ducklake_merge_adjacent_files on a schedule, don’t wait until query performance noticeably degrades to address it.
Forgetting that renamed columns keep their original Parquet field names
This is expected, DuckLake doesn’t rewrite the file, it just updates the catalog mapping. It only becomes a problem if you, or another tool, read the raw Parquet files directly outside of DuckLake and expect the renamed column name to appear there. It won’t; only DuckLake’s catalog-aware reads see the new name.
Troubleshooting

IO Error when running ATTACH
Usually means the path you gave isn’t writable, or a previous process still has the catalog file locked. Close any other DuckDB connections to the same .ducklake file and confirm you have write permission in the target folder.
Catalog Error: Table does not exist after restarting your session
You forgot to re-run ATTACH and USE lakehouse after closing your terminal or kernel, see the note in Step 2. Your data is still there; you just need to reconnect to it.
Connection refused when attaching a PostgreSQL catalog
Either Postgres isn’t running, or the host/port in your connection string doesn’t match. If you’re using the Docker container from Step 10, confirm it’s still running with docker ps, and double-check you’re using host=localhost and the same credentials you set when starting the container.
A query against an old snapshot returns Binder Error for a column
This is expected, not a bug, if you query AT (VERSION => N) for a version before a column existed, DuckLake correctly tells you that column wasn’t there yet. Check which version actually introduced the column with ducklake_snapshots(‘lakehouse’).
Disk usage keeps growing even after deleting rows
This is the maintenance gap from Step 9, DuckLake never deletes files automatically. Run ducklake_expire_snapshots followed by ducklake_cleanup_old_files to actually reclaim space.
ATTACH for the Iceberg REST catalog in Step 12 hangs or times out
This almost always means there’s no Iceberg REST catalog actually running at the endpoint you gave it. Confirm the service is up (curl the endpoint directly) before troubleshooting the DuckDB side.
Conclusion
You now have a working local lakehouse: two related tables, several snapshots of history, a schema change that cost zero data rewrites, a transaction that touched both tables atomically, a maintenance routine, a path to multiple concurrent writers, and a working migration bridge to Apache Iceberg, all backed by nothing more exotic than a DuckDB file (or Postgres) and a folder.
This setup runs fine entirely on your laptop, which is the point: you don’t need a Spark cluster or a managed catalog service to evaluate whether this architecture fits your workload. From here, a few natural next experiments:
- Point DATA_PATH at S3 or GCS instead of a local folder, every statement in this tutorial stays identical, only the storage target changes.
- Schedule CHECKPOINT as a recurring job once this stops being a tutorial and starts being something you run continuously.
- Review the official DuckLake maintenance docs for the full set of tuning options, retention windows, compaction thresholds, and per-table maintenance settings, before relying on this in production.
If you’re now weighing whether to take this further than a laptop prototype, our DuckLake vs. Apache Iceberg comparison walks through the cost, concurrency, and ecosystem trade-offs to help you decide if it’s the right call for your team.


[…] Read the Full Article → […]
[…] Read the Full Article → […]