
You’ve probably heard the word “agent” a hundred times this year. Maybe it’s started to feel like just another buzzword stapled onto every chatbot demo.
Here’s the thing: it isn’t.
An AI agent is a different kind of software. It doesn’t just answer you. It looks at a goal, breaks it into steps, takes action, checks its own work, and tries again if something’s wrong. That last part, checking its own work, is what separates a real agent from a fancy autocomplete.

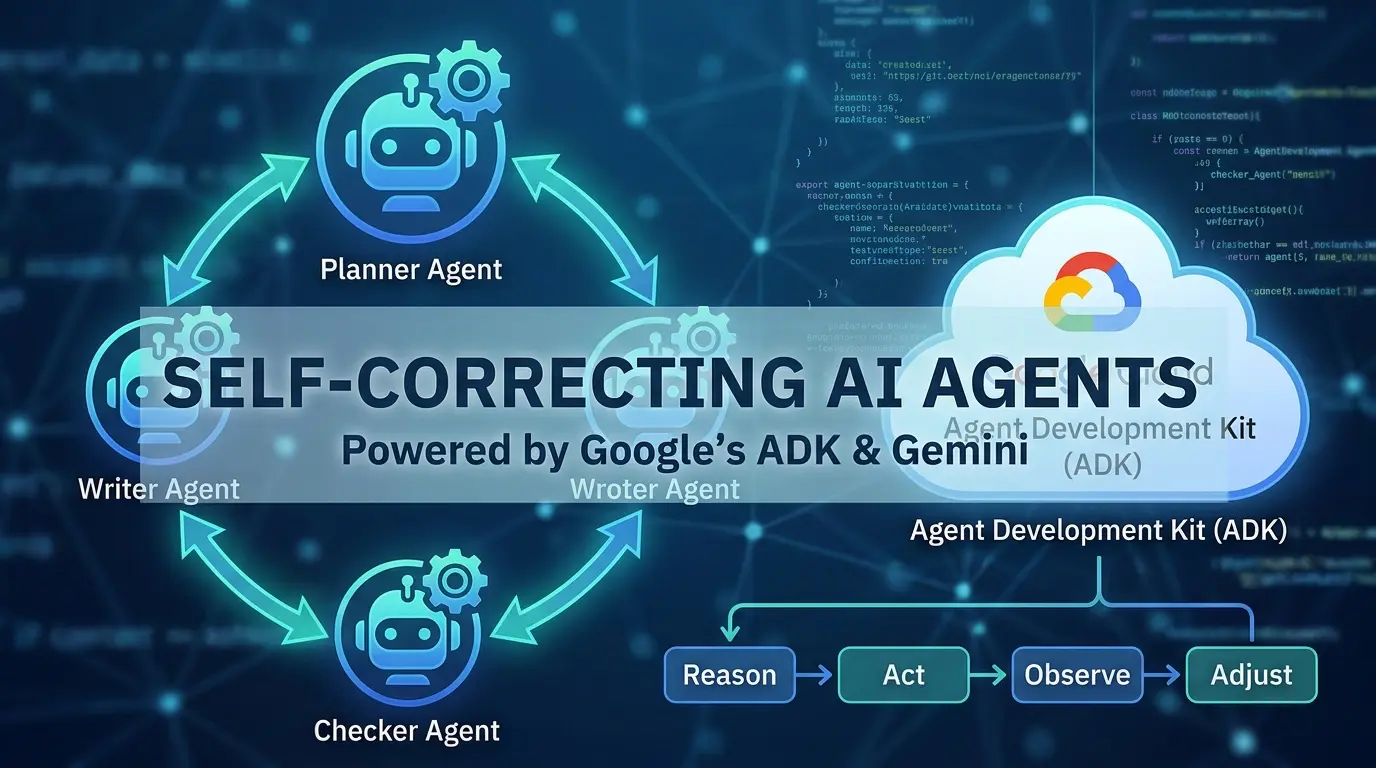
In this guide, you’ll learn what AI agents actually are, the three core patterns they follow, and how to build your first multi-agent system using Google’s Agent Development Kit (ADK), Google ADK. By the end, you’ll have working code for a “blog factory”, a small team of AI agents that plan, write, and check their own content before handing it back to you.
- An AI agent reasons about a goal, takes action, observes the result, and adjusts. This feedback loop is the foundation of modern agent design.
- There are three broad agent patterns: Sequential, Reactive, and Planning, each suited to different types of tasks.
-
Google’s ADK lets you build agents as LLM-powered units and orchestrate them using components such as
SequentialAgent,LoopAgent, andParallelAgent. - The Implement → Verify → Fix pattern, where a writer agent is paired with a checker agent, can dramatically improve success rates on complex tasks.
- Self-correcting loops increase reliability but also increase cost. Multiple retries can consume many times the tokens of a single LLM call.
- Production-grade agents are often deployed as independent microservices (A2A architecture), improving resilience while introducing some operational overhead.
-
Strict schema validation using tools such as
Pydantichelps prevent silent failures and broken agent-to-agent communication.
What Is an AI Agent, Really?
Let’s start with a clean definition, because this word gets stretched in every direction.

Definition: An AI agent is a software system that uses a language model to reason about a goal, select and use tools, observe the results of its actions, and decide what to do next, with enough autonomy to complete multi-step tasks without a human directing every move.
That’s different from a traditional chatbot. A chatbot takes your message and generates one response. Done. An agent takes your request, figures out what steps are needed, maybe calls a search API, runs some code, looks at what came back, and then decides what happens next. It can loop through that process multiple times before it ever shows you a final answer.
This idea isn’t just marketing language. It traces back to a well-known research paper, ReAct: Synergizing Reasoning and Acting in Language Models, which proposed that language models shouldn’t just generate text in one shot. Instead, they can reason step by step, take an action like calling a tool, observe what happens, and adjust their plan based on that observation. That reason-act-observe cycle is now the backbone of almost every agent framework on the market, including Google’s ADK.
The Reason → Act → Observe Loop, Explained Simply

If you remember nothing else from this article, remember this loop. It’s the engine inside every AI agent.
- Reason: The agent breaks down your goal. “Write a blog post about X” becomes “I need an outline first, then a draft, then a final check.”
- Act: The agent calls a tool. That might be a search API, a code interpreter, a database query, or another agent.
- Observe: The agent reads the result of that action. Did the search return useful info? Did the code run without errors?
- Decide: Based on what it observed, the agent either moves to the next step, retries the current step, or wraps up and responds to you.
Think of it like cooking dinner from a recipe you’ve never tried. You read the next step (reason), do it (act), taste or check the result (observe), and then decide whether to keep going, fix something, or adjust the next step. A traditional chatbot is like someone who reads the whole recipe once and describes the finished meal to you, without ever stepping into the kitchen.
When someone says an AI system has “agentic” behavior, ask one question: Does it observe the results of its own actions and change course based on them? If the answer is no, it’s a workflow, not an agent.
Three Agent Patterns: Sequential, Reactive, and Planning
Not every agent behaves the same way. Most designs fall into one of three broad patterns, and picking the right one shapes everything else about your build.
| Pattern | How It Works | Best For | Trade-off |
|---|---|---|---|
| Sequential | Runs fixed steps in order, like an assembly line. | Predictable, repeatable workflows. | Rigid — cannot adapt mid-task. |
| Reactive | Looks at the current state and decides the next move on the fly. | Dynamic, unpredictable environments. | Flexible but does not plan ahead. |
| Planning | Sketches a multi-step plan first, then executes it. | Multi-step goals with dependencies. | More overhead and slower to start. |
A planning agent is like booking a trip. You don’t just buy a random flight. You pick your dates, then your hotel, then your transportation, in that order, because each choice depends on the last. A reactive agent, by contrast, is more like a customer service bot that just reacts to whatever the user types next, one message at a time, without a long-term plan.
For simple, predictable flows, sequential is usually all you need. For dynamic situations, reactive agents work better. And for multi-step goals where one step depends on the output of another, like writing, checking, and publishing a blog post, you want a planning-based, multi-agent architecture. That’s exactly what we’re building next.
Inside Google’s Agent Development Kit (ADK)
Definition: Google’s Agent Development Kit (ADK) is an open-source, code-first framework for building, evaluating, and deploying AI agents, from a single LLM-powered agent to complex hierarchies of specialized sub-agents working together.

ADK is built around a small set of building blocks. An LlmAgent is powered by a model (like Gemini) and given instructions, a description, and optionally a set of tools. Then there are workflow agents, deterministic controllers like SequentialAgent, ParallelAgent, and LoopAgent, that orchestrate how those LLM agents run, without relying on the model itself to manage the whole flow. According to Google’s ADK documentation, this separation lets you mix non-deterministic AI reasoning with deterministic code where it matters most.
The typical production structure looks hierarchical: a “Root Agent” acts as an orchestrator, and it delegates specific jobs to specialized sub-agents, a planner, a drafter, a critic, each with a narrow, well-defined job. That separation of concerns is the difference between an agent that occasionally goes off the rails and one you can actually trust in production.
Step-by-Step: Build Your First Multi-Agent Blog Writer
Now let’s build something real. We’re going to create a small “blog factory”, a group of agents that take a topic, plan an outline, write a full post, and check their own work along the way.

Step 1: Set Up Your Environment
First, install uv, a fast Python package manager, and then install the ADK package itself.
pip install uv

uv pip install google-adk
Create a new file called agent.py and import the pieces you’ll need from ADK.
from google.adk.agents import LlmAgent, LoopAgent, SequentialAgentStep 2: Build the Blog Planner
The first agent has exactly one job: turn a topic into a structured outline. Notice the instruction spells out precisely what “done” looks like, a title, a short intro, four to six sections with bullet points, and a conclusion. Being this specific is what makes the output reliable.
blog_planner = LlmAgent(
    name="blog_planner",
    model="gemini-2.0-flash",
    description="Turns a topic into a structured blog outline.",

    instruction="""
Given a topic, write a markdown outline containing:
- A title
- A short introduction
- 4 to 6 sections, each with bullet points
- A conclusion
""",

    output_key="blog_outline",
)
That output_key matters. It tells ADK to save whatever this agent produces into shared state under the name blog_outline, so the next agent in line can pick it up automatically.
Step 3: Add an Outline Validation Checker
This agent doesn’t write anything new. Its only job is to check the outline that’s already in shared state. If it has a title, an intro, four to six sections, and a conclusion, it responds with “OK.” If something’s missing, it responds with “RETRY” and explains what’s wrong.
outline_checker = LlmAgent(
    name="outline_checker",
    model="gemini-2.0-flash",

    instruction="""
Check 'blog_outline' in shared state.

If it has:
- title
- intro
- 4–6 sections
- conclusion

Respond exactly:
OK

Otherwise respond:
RETRY

And include one line explaining what's missing.
""",
)
Step 4: Wrap Them in a Loop Agent
Now combine the planner and the checker into a LoopAgent called robust_blog_planner. The loop runs the planner, then the checker. If the checker says “OK,” the loop ends. If it says “RETRY,” the planner runs again, up to three times. This gives you a built-in safety net if the model forgets a section the first time around.
robust_blog_planner = LoopAgent(
    name="robust_blog_planner",
    sub_agents=[
        blog_planner,
        outline_checker
    ],
    max_iterations=3,
)
Step 5: Build the Blog Writer (and Its Checker)
The writer agent reads blog_outline from shared state and turns it into a full markdown post. Its instructions tell it to write for software engineers, skip the basics, explain both the “how” and the “why,” and include short code snippets where useful. The finished draft is saved under blog_post.
blog_writer = LlmAgent(
name="blog_writer",
model="gemini-2.0-flash",
instruction=""" Read 'blog_outline' from shared state and write a full markdown blog post for software engineers. Skip basic definitions. Explain the how and the why. Include short code snippets where helpful. Follow the outline's headings. """,
output_key="blog_post",
)

post_checker = LlmAgent(
name="post_checker",
model="gemini-2.0-flash",
instruction=""" Check 'blog_post' in shared state. Confirm it has an introduction, sections matching the outline, a conclusion, and clear explanations. Respond OK if it passes, or RETRY with a list of fixes if it doesn't. """,
)

robust_blog_writer = LoopAgent(
name="robust_blog_writer",
sub_agents=[blog_writer, post_checker],
max_iterations=3,
)
Step 6: Wrap It All Up with a Root Agent
Finally, wrap both loops as tools and give them to a root agent called blogger. Its instructions are simple: take the topic, call the planner tool, call the writer tool, then add three alternative titles and two tweet-length hooks. The root agent only has access to those two tools, so its workflow stays clear and controlled.
blogger = LlmAgent(
name="blogger",
model="gemini-2.0-flash",
instruction=""" Given a topic: 1. Call the planner tool to create an outline. 2. Call the writer tool to draft the full post. 3. Add three alternative titles and two tweet-length hooks. """,
tools=[robust_blog_planner, robust_blog_writer],
)
Step 7: Run It
Open your terminal and launch the dev UI:
adk webOpen the local link in your browser, give it a topic, say, “top 10 use cases for AI agents”, and watch the planner, writer, and checkers work together in real time. That’s a working, self-correcting multi-agent system.
The Implement-Verify-Fix Pattern (Why This Works)

The pattern you just built has a name: Implement-Verify-Fix. It’s the secret sauce behind most reliable agent systems, and it’s worth understanding on its own.
- Implement: One agent (the “drafter”) produces an output: an outline, a paragraph, a piece of code.
- Verify: A second agent (the “critic”) checks that output against a clear standard — does it have the right structure, the right number of sections, the right level of detail?
- Fix: If the check fails, the system feeds the critic’s feedback back to the drafter, which tries again.
Why does this matter so much? A single LLM pass on a complex task often fails, research on agentic workflows suggests single-pass success rates land around 60-70% for complex tasks. Add one validation loop, and that number can climb above 90%. That jump is the entire reason multi-agent systems exist. It’s not about making AI “smarter” in some abstract sense, it’s about giving it a second pass to catch its own mistakes, the same way a human writer benefits from an editor.
This also explains the “separation of concerns” idea from earlier. You wouldn’t hire one person to be your CEO, your writer, and your editor, each role needs a different mindset. The same logic applies to agents: a planner agent should only output structure (ideally as clean, structured data), a drafter should only focus on prose, and a validator should only run checks.
Hidden Costs and Production Realities
Tutorials make agent loops look free. They aren’t. Here’s what changes once you move from a demo to something running in production.

The Cost of Autonomy
The fix is simple but easy to forget: build in circuit breakers. That’s exactly what max_iterations=3 did in our code above, a hard limit that stops the loop after a fixed number of retries, win or lose. Without it, a confused agent could retry forever.
Single Process vs. Agent-to-Agent (A2A) Architecture
Most tutorials, including the one we just walked through, run everything in a single Python script. That’s great for learning, but production systems often split agents into separate microservices, frequently deployed on something like Google Cloud Run. In this “Agent-to-Agent” (A2A) setup, the writer agent can crash without taking down the planner agent, and each piece can scale independently.
The trade-off is latency. Cloud Run scales services down to zero when they’re idle, and Google’s own documentation notes that setting a minimum number of warm instances is the recommended way to reduce the cold-start delay when a new request arrives after idle time. If your agent microservices scale to zero between requests, your first call after a quiet period will feel noticeably slower than the rest.
Latency Is the New Bottleneck
A multi-step agentic workflow, plan, write, check, retry, check again, can easily take 45 to 90 seconds end to end. That’s a long time for a user to stare at a loading spinner.
Advanced Production Patterns (What Tutorials Don’t Show You)
If you want to move beyond local demos and build agents that actually survive in production, you need to deal with messy data, runaway token counts, and the occasional need for a human to grab the steering wheel. Here are the patterns that make that possible.

Giving Agents Real Tools (Not Just Prompts)
In our blog factory, the agents passed text back and forth through a shared state. That’s fine for a writing task, but real agents need to take real actions, calling an API, querying a database, or searching the live web. ADK handles this through custom tools. When you give an agent a tool, the Reason-Act-Observe loop becomes literal.
The agent reasons that it needs information, acts by calling the tool, and observes the tool’s output before deciding what to do next. Let’s give our blog_writer a Google Search tool so it can pull fresh data instead of relying on outdated training knowledge.
from google.adk.tools import FunctionTool

def search_web(query: str) -> str:
    """Searches the web for the given query and returns top results."""
    # In production, replace this with an actual API call (e.g., Custom Search JSON API)
    return f"Search results for: {query}. Latest data shows..."


search_tool = FunctionTool(fn=search_web)


blog_writer = LlmAgent(
    name="blog_writer",
    model="gemini-2.0-flash",
    instruction="""
Read 'blog_outline' from shared state and write a full markdown blog post.

If you need up-to-date statistics, facts, or examples for a section,
use the search_web tool before writing that section.
""",
    tools=[search_tool],
    # The agent now decides WHEN to call this
    output_key="blog_post",
)
Now, the agent isn’t just guessing. It decides on its own whether it knows enough to write a section or if it needs to search for facts first. That autonomy is the whole point.
Killing Silent Failures with Pydantic Schemas
Earlier, we mentioned that passing malformed data between agents causes silent failures. The planner outputs a messy string, the writer tries to guess what it means, and the final output is garbage. The fix isn’t just better prompting. It’s strict schema validation using Pydantic. Instead of letting the planner dump raw text into a shared state, we force it to output a structured JSON object that matches a strict data model.
from pydantic import BaseModel, Field
from typing import List


class BlogSection(BaseModel):
    heading: str = Field(description="The heading for this section")
    bullet_points: List[str] = Field(description="List of key points to cover")


class BlogOutlineSchema(BaseModel):
    title: str = Field(description="The catchy title of the blog post")
    intro: str = Field(description="A two-sentence introduction")
    sections: List[BlogSection] = Field(description="Exactly 4 to 6 sections")
    conclusion: str = Field(description="A one-sentence wrap-up")


blog_planner = LlmAgent(
    name="blog_planner",
    model="gemini-2.0-flash",
    description="Turns a topic into a structured blog outline.",
    instruction="Given a topic, generate a blog outline.",
    output_key="blog_outline",
    output_schema=BlogOutlineSchema,  # Forces structured JSON output
)
If the model tries to skip the conclusion, the schema validation catches it immediately and forces a retry at the API level, before it ever reaches the writer agent. It turns a vague, confusing failure into a hard, debuggable error.
Hitting the Brakes: Human-in-the-Loop
Autonomy is great until an agent decides to send 1,000 emails or delete a database. For high-stakes actions, you don’t want a loop; you want an interrupt. In production, if a checker agent flags a critical issue after the maximum retries, the system shouldn’t just output the broken result.
It should pause and hand control back to a human. While ADK handles the agent logic, you implement this at the application layer by monitoring the final state of your LoopAgent. If the loop exhausts its max_iterations without an “OK”, trigger a human review workflow instead of returning the output to the user.
The Token Bomb in Your Loop (Context Management)
Here’s a hidden trap in the Implement-Verify-Fix loop: every time a loop retries, the conversation history gets longer. If the planner fails the first time, the checker says “RETRY, missing conclusion.” The second time, the planner sees the original prompt, its first failed attempt, and the checker’s feedback. By the third retry, the context window is stuffed with failed attempts. This does two things:
- It drastically increases your token costs (you pay for input tokens on every retry).
- It confuses the model. Too much failure history can cause the model to hallucinate even more.
Shining a Light on Ghost Logic (Tracing)
We talked about “Ghost Logic”, when an agent silently skips a step. Standard logs won’t help you because the agent didn’t crash; it just made a bad decision. To debug this, you need Observability. You need to trace the agent’s step-by-step reasoning. Tools like LangFuse, Arize Phoenix, or Google Cloud Trace integrate with ADK to visualize the agent’s exact path.
They show you the prompt sent, the tool called, the reasoning the model used to skip a step, and the final output. Without a tracing UI, debugging a multi-agent system in production is like flying blind.
Common Mistakes (and How to Fix Them)

The Silent Failure of Tool Handoffs
Most tutorials assume tools always return clean data. In practice, agents fail constantly because of malformed JSON passed between steps. If your planner agent hands the writer a broken outline, the writer shouldn’t try to “guess” what was meant, it should flag the error.
The fix is strict schema validation. Libraries like Pydantic let you define exactly what shape your data should take using Python type hints, and they raise a clear error the moment something doesn’t match. Building this kind of check between every agent handoff turns vague, confusing failures into specific, debuggable ones.
Debugging “Ghost” Logic
What do you do when an agent silently skips a step it was supposed to take? Regular application logs won’t show you that, they only show what did happen, not what an agent decided not to do. This is where tracing tools become essential: they let you visualize the agent’s decision path step by step, not just the final error message.
Confusing “Planning” with “Reasoning”
These two words get used interchangeably, but they’re not the same thing. Reasoning is the model’s general ability to think through a problem. Planning is the specific output, a structured schedule of steps, that a dedicated planning agent produces. Treating “planning agent” as a design pattern, rather than just a side effect of a smart model, is what makes multi-agent systems predictable.
Agentic Workflows vs. RAG: What’s the Difference?
People often lump “agents” and “RAG” (Retrieval-Augmented Generation) together, but they solve different problems.
| Aspect | RAG | Agentic Workflow |
|---|---|---|
| Core Job | Retrieves relevant information so the model “knows” more | Takes actions and adapts based on results |
| Typical Output | A grounded answer based on retrieved documents | A completed multi-step task (drafted, checked, fixed) |
| Decision-Making | Minimal — mostly retrieve-then-generate | Central — reason, act, observe, repeat |
In short: RAG helps a model know things. Agents help a system do things. Many real systems combine both, an agent that uses RAG as one of its tools, but they’re solving different parts of the problem.
Before vs. After: What Changes When You Add Agents

Before (single LLM call): You send one prompt asking for a finished blog post. You get one response back. If it’s missing a section, has weak examples, or skips your style guide, you either accept it or manually rewrite the prompt and try again, and again.
After (multi-agent system): You send a topic. A planner agent produces a structured outline. A checker confirms the outline is complete, or sends it back for another pass. A writer agent drafts the post from that outline. A second checker verifies the draft against the outline and basic quality standards, or sends it back with specific fixes. You get a result that’s already been reviewed before it reaches you, with a bounded number of automatic retries built in.
The difference isn’t magic. It’s structure, breaking one big, unreliable request into smaller, checkable pieces.
Emerging Trends in Agent Architecture
Two trends are shaping where this space goes next.
Agent-to-Agent (A2A) protocols are an effort to standardize how agents from different systems talk to each other, similar to how APIs standardized how applications talk to each other. The goal is a future where a “writer agent” built by one team can call a “research agent” built by a completely different team, using a shared protocol.
“Flash” models for loops. Because retries and validation loops multiply your model calls, many teams now use smaller, faster, cheaper models for the internal drafting and checking steps, and reserve their most capable model for final polish or the trickiest planning decisions. It’s a practical way to keep the Implement-Verify-Fix pattern affordable at scale.
- AI agents reason, act, observe, and adjust — chatbots just respond.
- Pick sequential, reactive, or planning patterns based on whether your task is predictable, dynamic, or has step dependencies.
- ADK’s LlmAgent + LoopAgent combo is the simplest way to build a self-correcting workflow.
- Implement-Verify-Fix loops dramatically raise success rates — but they also raise costs, so use circuit breakers.
- Validate data between agent handoffs to avoid silent failures.
You now understand what makes an AI agent different from a chatbot, the three patterns agents follow, and how to build a self-correcting multi-agent system with Google’s ADK. You’ve also seen the parts most tutorials skip, cost, latency, validation, and debugging, which is exactly the stuff that determines whether your agent survives contact with real users.
The best next step is the one from the tutorial: open your terminal, run adk web, and give your blogger agent a topic. Watch it plan, write, check, and fix itself in real time. That loop, reason, act, observe, adjust, is the whole story of AI agents, and now you’ve built one yourself.
Frequently Asked Questions
What is an AI agent in simple terms?
An AI agent is software that uses a language model to figure out the steps needed to reach a goal, take actions like calling tools or running code, check the results, and decide what to do next — instead of just generating a single response.
Why is my AI agent hallucinating or producing wrong outputs?
Often it’s because there’s no validation step. Without a checker agent reviewing the output against clear criteria, errors and missing pieces go straight through. Adding an Implement-Verify-Fix loop is the most common fix.
How much do AI agents cost to run compared to a single prompt?
Significantly more if they include retries and validation. A loop that retries up to three times and validates twice can cost roughly 9–15x a single LLM call. Setting a maximum number of iterations (a circuit breaker) keeps this bounded.
What’s the difference between sequential, reactive, and planning agents?
Sequential agents run fixed steps in order, like an assembly line. Reactive agents decide their next move based on the current situation, without a long-term plan. Planning agents sketch out a multi-step plan before acting, which suits tasks where steps depend on each other.
Do I need Google’s ADK specifically to build AI agents?
No, but it’s a convenient, open-source way to start. ADK provides ready-made building blocks — LlmAgent for model-powered reasoning, and workflow agents like SequentialAgent and LoopAgent for orchestration — so you don’t have to build the orchestration logic from scratch.
What’s the difference between AI agents and RAG?
RAG (Retrieval-Augmented Generation) retrieves relevant information so a model can answer questions more accurately. Agents go further — they take actions, observe results, and adapt their plan. Many systems combine both, using RAG as one of an agent’s tools.
How do I debug an AI agent that skipped a step?
Standard application logs usually won’t show you a skipped decision. Use a tracing tool that visualizes the agent’s full decision path — what it considered, what it chose, and what it skipped — rather than relying only on error logs.
How do I prevent my AI agents from passing broken data to each other?
Use strict schema validation with libraries like Pydantic. By defining an output_schema for your agent, you force the LLM to return structured JSON. If the output doesn’t match the schema, it fails immediately, preventing silent errors from cascading to the next agent.
What is Human-in-the-Loop in AI agents?
It’s a design pattern where an autonomous agent pauses its workflow and asks for human approval before executing high-stakes actions. Instead of giving an agent full autonomy to delete data or send emails, the agent suggests the action, and a human must click “approve” before it proceeds.


[…] Read the Full Article → […]